BLOG 
Teaching my two-year-old, Part 1: Black, White, Ssshhh!
Posted by Ahmed Anzaldúa on February 15, 2013. 0 comments
If you have never seen a piano keyboard what immediately catches your eye?
That there are white keys and black keys.
Even if you don’t know what they do, it is easy to understand that the white keys and the black keys are different from each other. All you need to know is black from white, something that most toddlers know by the time they’re two years old. The same cannot be said about many other aspects of the keyboard, which require knowing left from right or more complicated spatial reasoning.
The first thing a child will learn about the piano is that pressing the keys makes noise. Noise versus quiet is a good starting point for a game. You can play it with flashcards or with a sheet of paper (I prefer a single sheet of paper because it mirrors the act of reading sheet music better.) Make a drawing that means “noise” (for example, lots of squiggles) and one that means “quiet”. Then practice making lots of noise or lifting your hands and being quiet when you point to one or the other.
At this point, the student only needs to keep track of two elements: “noise” and “ssshhh!”
Making the transition from banging on the keys indiscriminately to finding and playing specific keys can be a struggle. Putting stickers on the keys is a common approach, but it carries its own set of problems. I prefer to start with the things that are immediately obvious about the piano and gradually work our way to specifics, one element at a time. Showing the difference between black and white keys is a great next step because it only requires adding one more element to what we already know.
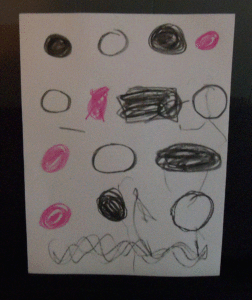
First, we practiced playing only white keys or black keys at one time, so I could make sure that my kid was ready to understand the difference between them. Then we composed our score:
We already knew the difference betwen noise and quiet, so now we have two categories of noise: black-key noise and white-key noise, represented by the white and black circles. Whenever we got to a red circle, that meant “Ssshhh!” (put your hands up and be quiet!) As you can see by our sheet music, I drew the first few circles and then my kid took over. Once we had our sheet music, we started to play.
I would point to a circle and we’d do it together. Hold down the sustain pedal for each “event” (and remove it for the moments of quiet). After our first run-through he was the one playing and I was only pointing at circles. By our third run-through, he was reading the sheet music on his own:
At this point, a student is keeping track of three elements: “white”, “black”, and “ssshhh!”
What’s our next step?
The key is to add other elements gradually. For instance, we can add “loud” and “soft” playing, play with durations (with bigger and smaller circles), or we can play in different registers using four elements: “tweeting birdies”, “mewing kitties”, “barking doggies” (top, middle, and bottom registers), and “ssshhh!” As we combine all the things we know, things can get complicated very quickly. For example combining register with black and white keys yields seven different elements to identify in the sheet music:
1. High-register black keys
2. Middle-register black keys
3. Low-register black keys
4. High-register white keys
5. Middle-register white keys
6. Low-register white keys
7. Ssshhh!

